This page is dedicated to the most serious quality problem affecting the GE Superadio 3, the tuning instability - an more importantly - a FIX. Describing this problem is much harder than experiencing it, but it seems like the radio keeps tuning off frequency after you stop touching the tuning knob. As you attempt to correct, it seems like the same station(s) appear over and over again until it settles down - hopefully on the station you want. It is very frustrating to deal with!
From the onset, it seemed obvious that the intability might be related to the tuning voltage:
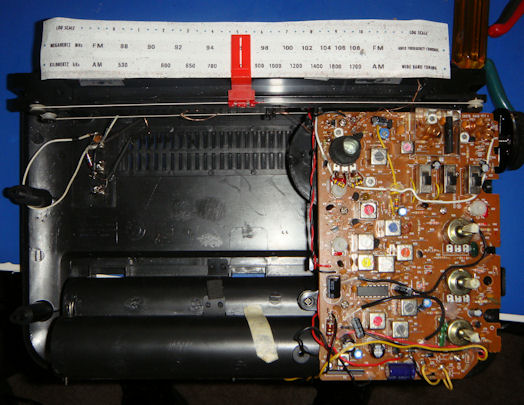
I disassembled a defective pot to see how it was made, and so I could compare it to a good tuning pot from an older, stable SR-3:
Of particular note is the multiple prong "tuning fork" design of the wiper. This contrasts with the older, stable tuning pot, which uses a "ball" to contact the carbon of the pot.

I thought that maybe - the tuning fork could be modified to have a single contact point, perhaps fixing the problem. However, that made no difference whatsoever. It seems that there is a small amount of play in the shaft bearing that causes minute changes in resistance, leading to the instability. Bad for someone wanting an easy fix for the radio - it means you need to replace the pot.
The problem is that the value of the pot is 300k, a somewhat oddball value. I tried to replace the entire tuning system by scaling down both scaling resistors and the tuning pot, making a standard value of 100k, but had no success.
I next tried scaling up the tuning system using a standard value of 500k, with no luck initially. However, I have had better luck lately - it is possible that the range pots R1 and R2 have been changed, in combination with the series resistors going to the varactors. 500k is now usable - as is!!!
Although the new pot fixes the problem completely, I found that the top of the band is still a little bit hard to tune. I double checked an SR3 with an original pot, and even it is a bit hard to tune at the high end of the band. I found that I could gain even more stability, especially at the top of the band, if I made connections to the pot with flexible solder wick braid instead of simply forming the leads to go directly into the board. This is a bit more of a hassle, but it helps:

In some SR-3's, it is necessary to trim down the tuning pot a bit. For a long time, I used 470k in parallel with each leg of the pot (470k from each side to center):

A problem with this way of trimming down a pot is that it makes a linear pot non-linear. So the dial calibration is way off. But having a radio with stable tuning is well worth the minor inconvenience. Even if you don't trim the pot, dial calibration is still worse with a 500k pot instead of a 300k pot, mainly at the lower end of the dial.
Here is a picture of the pot in its packaging from Frys (only the real pot is 500k, not 100k):

The main problems with it are mechanical - cutting the shaft and filing down a flat portion so the dial pulley fits. Then there are the leads, too long to fit into the board without delicate bending. But - I can usually manage now that I've done several. It is possible to use the next larger variety of pot, but the hole in the PC board needs to be enlarged, it blocks access to some of the components unless you unsolder them and angle them away from the body of the part. The parasitic capacitance with the other tuning components are a problem. Find the 16mm pot if at all possible. Some usable Digikey numbers are 381N504-ND and CT2210-ND. But it looks like they have steel shafts - so machining will take longer! Do NOT get pots with switches, as the resistance rotational range will be too small and shrink the dial. With care, you can get a 300 degree rotational pot to fill the dial of the radio.
So, the fix is: